Before any of the work on the floor began, we spent hours researching different designs and approaches, ending up with a hybrid of the resources listed below. We will be using our van throughout all four seasons in the midwest, which required a bit more insulation than many of the examples we had come across.
Clutch Resources:
Moreysintransit - Floor Install
Far Out Ride - Floor Install
Home Sweet Van - Floor Install
Tools & Hardware
Jigsaw with a wood blade4x8 1/2" Plywood
Lots of heavy stuff
Caulk gun
Vinyl Flooring (we chose a waterproof rolled vinyl in grey/brown natural wood color)
Henry 650R pressure sensitive adhesive
Great Stuff spray foam
Metal Moulding (found in flooring section of home depot)
Hacksaw
Wet/Dry vac -amazon.com
Plastic drop cloth -amazon.com
Rustoleum white paint -amazon.com
Small foam paint brush -amazon.com
Orbital Sander -amazon.com
220 grit sandpaper -amazon.com
Razor with new blade
Loctite foamboard adhesive (2-3) -amazon.com
3M high strength contact adhesive 90 -amazon.com
Rigid Max 3.1 (R6) foam board insulation
Reflectix -amazon.com
Construction scissors
Broom
Painters tape
3/8" smooth-semi smooth 3" roller
Tape measure
Gloves, mask, hat
Hammer
The Install
Prep: Like many other components of a van build, once the floor is down, there is almost no way to remove it. Sand and paint any spots on the floor that resemble the slightest bit of rust and then clean the surface thoroughly. Take the time now to avoid major problems in the future.

The design: One layer of Rigid Max 3.1 (R6), cut to fill the low points on the floor. Reflectix covering the high points on the floor. One layer of Rigid Max 3.1 (R6) on top of the previous layer. A 1/2" plywood subfloor covered with a rolled sheet vinyl. Final R value ~13.
Timing: Overall the floor installation took us about 30 hours over the course of several days due to the drying time needed throughout the steps of the process.
We began by utilizing the rubber floor liner that came with the van as a template to cut the plywood subfloor sections (don't throw the liner way just yet, it will come in handy if you are using rolled vinyl like us). We cut the plywood horizontally with a jig saw, therefore requiring 3 4x8 sheets. Once cut, we sanded the boards down with 220 grit sandpaper on an orbital sander. It is a good idea to do this step first, so that you can use the plywood to help evenly distribute the weight required to adhere the insulation to the van floor. Make sure to cut about 1/2" outside of the floor liner trace to avoid larger gaps near the wheel wells. (We completely spaced on taking any pictures of this...sorry!!). It's a good idea to store the plywood standing up and indoors. If left laying down in the sun, the boards will begin to warp.
Next, we cut the Rigid Max insulation to fit the channels on the floor of the van. This process is tedious and was the most time consuming part of the floor installation.

Once all the pieces were cut, we laid them in the van and numbered each one. This removed any guess work when we were installing them with the adhesive. Trust us, you don't want to be trying to solve a puzzle while working against the clock of the adhesive drying!

We used Loctite foamboard adhesive to secure the Rigid Max to the van floor. We had done a few tests between Loctitie and 3M high strength contact adhesive 90 and found the Loctite performed slightly better with the added benefit of not being an aerosol. We applied a thick bead to the Rigid Max and utilizing the number system, secured each piece in place. We did not have enough heavy stuff to place on top of the entire length of the van, so we did the back 2/3 of the van one day and the front 1/3 the next. The Loctite should have about 24 hours undisturbed to dry and set.

With the first layer of Rigid Max secure, the next step was to cover the high ridges with strips of Reflectix. Using the tape that came with the rolls of Reflectix, we secured the cut strips into place. We purchased a pair of construction scissors which made the cutting a breeze!

The next step we did was insulating the wheel wells. This was a bit tricky due to the odd shape, but Amanda devised a great way to cut the Reflectix to make it easier. She cut a large piece that covered the entire wheel well and then once in the van, cut the piece to fit. Also, once you have the shape of one complete, you can trace it for the other side! We were having a hard time taping the large piece down, so opted to use the 3M high strength contact adhesive 90 which worked MUCH better.


This is the point where you want to evaluate the climate you'll be spending most of your time. Since we intend on using the van as a base camp to both summer and winter activities, we opted for one more layer of insulation. If your van is your beach house, this first layer would be more than enough.
For our next layer of insulation, we used more of the Rigid Max 3.1 (R6). We traced large 3 pieces from our plywood subfloor and adhered them directly to the first layer of insulation. We only applied the Loctite adhesive to the Rigid Max and not to the Reflectix.

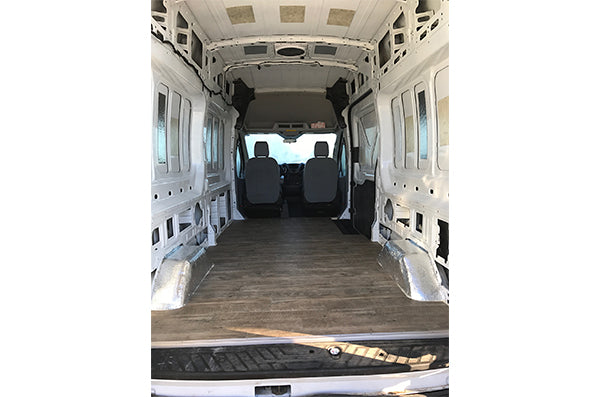
Once the second layer of Rigid Max was down, we repeated the drying process by placing the plywood sub floor over the insulation and emptying the garage of everything heavy to ensure a strong bond between the layers. We were now left with a very even and insulated floor surface! (This picture was taken before we glued down the second layer of Rigid Max. You would already have the wheel wells covered prior to finishing the second layer of Rigid Max)

The next step was laying down the plywood subfloor. Since our 3 pieces were already cut, all we needed to do was apply a generous amount of Loctite foamboard adhesive, lay the pieces into place and cover them with a bunch of heavy stuff from the garage. Make sure to put weight on the corners as they have a tendency to lift.

Once the plywood subfloor was down and set, we needed to fill in the gaps on the edges in between the plywood and the van walls. We decided to use Great Stuff spray foam filler. In preparation to filling the gaps, we placed blue painters tape above the gaps to prevent any excess foam from sticking to the van (see above). The can says that the foam will double in size from when it is sprayed, which we didn't believe at first, but trust us, it does! We filled in all the gaps and let the foam dry overnight. The next day we used a razor blade to remove the excess hardened foam and sanded smooth with the orbital sander.

The subfloor was now complete, which meant we could begin shopping for our flooring!

As we mentioned earlier, we opted to use rolled sheet vinyl flooring. We chose this flooring option because it is extremely durable, waterproof, easy to install and won't have issues with extreme hot or cold temperatures. Rolled sheet vinyl comes in a standard width of 12', which resulted in very little waste based on the dimensions of our van. We laid the flooring (bottom side up) and set the rubber floor liner on top to trace the exact shape we needed for the space. The Vinyl cuts super easy with construction scissors.

Now that we had our flooring cut to fit, it was time to secure it to the subfloor. We used pressure sensitive adhesive, which had been recommended by the associate at the flooring store. One quart of adhesive will be plenty. With a 3/8" 3" roller, we applied a healthy layer of adhesive directly to the plywood subfloor in the front half of the van (you can't apply adhesive to the entire floor at once because there would be nowhere to stand). After letting the adhesive set for about an hour, we laid down the vinyl flooring and used backside of a broom to push any air bubbles out of the front section. Next we rolled up the back section of the flooring, applied the adhesive to the plywood and let that setup for another hour or so.

Once set, we unrolled the balance of the floor and used the broom to smooth the floor and remove any air bubbles across the entire floor. Click here for a great video on installing sheet vinyl flooring.

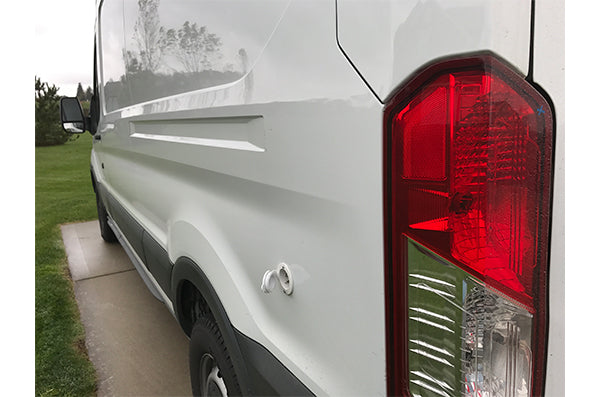
The last step of the floor installation was adding metal moulding to the front, back and side door exposed edges of the flooring. On the back and side door, we removed the plastic covering and added a strip of the Rigid Max insulation to shim the plastic and ensure a flush connection between the moulding and the plastic. We cut the metal moulding to size with a hacksaw and secured it with the provided nails.

And there you have it, our floor installation is complete!

14 comments
Larry McMahon
Taylor,
If I remember correctly, the product we used had foil on both sides, so i’m not sure we ran into this questions during our build. I did a little digging and found a good thread from a forum (link below). I hope this helps!
https://www.cheaprvliving.com/forums/Thread-Foil-Facing-In-Or-Out?pid=306180
Larry
Taylor Morrell
Hi, new to insulation of any sort so this may be an obvious question. Which side of the r-max should be facing down to the van floor? I was thinking the shiny side for heat reflection, but wanted to be sure before I start cutting. Thanks in advance!
Hi, new to insulation of any sort so this may be an obvious question. Which side of the r-max should be facing down to the van floor? I was thinking the shiny side for heat reflection, but wanted to be sure before I start cutting. Thanks in advance!
Dan Lewien
You have a great website! One of the best I have seen for describing your build. Shopping for our van now to convert. This was so educational. Thanks!!!!
You have a great website! One of the best I have seen for describing your build. Shopping for our van now to convert. This was so educational. Thanks!!!!
Larry
Andrew,
We have been very happy with the rolled vinyl. We have put it to the test now for 2 years and it is holding up well. I would certainly choose this path again based on how well it has held up and the east of installation. Hope this helps!
Larry
Andrew,
We have been very happy with the rolled vinyl. We have put it to the test now for 2 years and it is holding up well. I would certainly choose this path again based on how well it has held up and the east of installation. Hope this helps!
Larry
Andrew Fabricius
Thanks for this post. I’m trying to choose between the sheet vinyl or the vinyl locking floorboards. Did you find the sheet vinyl to be sturdy enough not to rip as you lived in the vehicle more? Would you still make the same decision today?
Thanks,
Andrew
Thanks for this post. I’m trying to choose between the sheet vinyl or the vinyl locking floorboards. Did you find the sheet vinyl to be sturdy enough not to rip as you lived in the vehicle more? Would you still make the same decision today?
Thanks,
Andrew
Aaron Fensterheim
Hey the floor you have installed looks amazing and attractive .
through your article its clear that converting a van is not everyone’s cup of tea.
https://www.ogavans.com/
Hey the floor you have installed looks amazing and attractive .
through your article its clear that converting a van is not everyone’s cup of tea.
https://www.ogavans.com/
Larry McMahon
Bethany,
It’s tough to say exactly without seeing the floor / doorstep, but if the floor ends up being a bit higher than the door step, you could use a vinyl stair nose moulding (https://www.amazon.com/M-D-Building-Products-29702-36-Inch/dp/B0017GJVDS/ref=sr_1_4?crid=2YUE42SY2O3GL&keywords=vinyl+stair+nose+molding&qid=1562632007&s=gateway&sprefix=vinyl+stair+nose%2Caps%2C146&sr=8-4) and seal both the top and bottom with a clear silicon to keep any moisture out. Another option could be making a transition out of a material similar to this vinyl. Best of luck on the build!!
Larry
Aaron Fensterheim
Thanks for the plethora of information the flooring used looks outstanding and luxurious. https://www.ogavans.com/
Thanks for the plethora of information the flooring used looks outstanding and luxurious. https://www.ogavans.com/
Bethany
Hello…
I’m starting my van floor. It’s a mini van so lots of angles and uneven-ness to the floor. Also, since it’s a minivan, the floor just buts up to the outside of the van entrance…no step or anything…which means everytime I open the door in the rain…the floor gets a bit wet. Currently there is some plastic molding that covers the doorstep, which is nice because it wraps all the way to the underside of the metal…so at least stuff isn’t sinking in underneath the liner and the metal. Do you have any thoughts about keeping this molding on, and putting flooring over it—-all the way up to the edge of van? is there something else I could use to wrap all the way to underside of van that would accomplish the same thing? I’m using 34" polysio foam and 1/4" subfloor stuff…not sure yet what I"ll put on top of that. Of course if I end the flooring right at the plastic molding, then the floor will be a little higher than the molding…. so may another option would be getting some kind of transition thing to go between these? This seems like it would be a place water could accumulate though. Sorry this is so long, anyway thanks for the great build info!
Larry
Erica,
We would highly recommend sanding and painting anywhere the paint has chipped. By no means do you need to sand and re-paint the whole floor. We used a white Rust-Oleum paint to cover chipped paints spots on both our floor and walls. This is one of those places where a few extra minutes of work can pay off huge down the road. Thanks for the question!
Erica Marie McCullough
I just brought my transit used, and the floor has wear and tear with paint chip but no visible rust, should I sand and recoat before doing the floor?
I just brought my transit used, and the floor has wear and tear with paint chip but no visible rust, should I sand and recoat before doing the floor?
Larry McMahon
Jordan / Stanislao,
We used the 1" thick Rmax insulation. In total, the Rmax, plywood and vinyl flooring end up being just under 2". I hope this helps!
Jordan / Stanislao,
We used the 1" thick Rmax insulation. In total, the Rmax, plywood and vinyl flooring end up being just under 2". I hope this helps!
Stanislao
What is the total thickness of the floor insulation?
What is the total thickness of the floor insulation?
Jordan
Did you guys use 1" foam or 1/2" foam to insulate? I got 1" and it seems to stick up a bit. Do you have larger photos of the process?
Did you guys use 1" foam or 1/2" foam to insulate? I got 1" and it seems to stick up a bit. Do you have larger photos of the process?