
We began our bed design research knowing that we wanted the accomplish the following things:
1. A permanent bed structure
2. Queen size mattress
3. Ability to sit up in bed
4. Ample under bed storage
Clutch Resources:
Sprinter Van Diaries - Bed Frame ConstructionInstructables
Tools & Hardware
Mitre Saw -amazon.com
Cordless Drill
Jigsaw with a wood blade -amazon.com
Kreg pocket hole jig and screws
4x8 1/2" Plywood
2x3 studs (straight as you can find)
1x3 pine boards
1/8" 4x8 plywood veneer (for backing)
1/2" birch plywood
1" L brackets
Basic hinges
Orbital Sander -amazon.com
220 grit sandpaper -amazon.com
3M high strength contact adhesive 90 -amazon.com
Black Mountain wool 16" batt insulation -eco-buildingproducts.com
Reflectix -amazon.com
Electrical wire & split loom tubing
Wire cutters
Stain and Brush
Tape measure
Level
8" Zinus memory foam mattress in short Queen -amazon.com
Prep:
Before we could begin working on the bed itself, we needed to complete any wiring / insulation for areas that would no longer be accessible once the bed was installed. Even if you have your electrical plan finalized, it's not a bad idea to run a few extra wires just in case you want to add on at a later date. Once the bed in installed, this process gets significantly harder. As with all the wires in our build, we encased them in split loom tubing for protection.

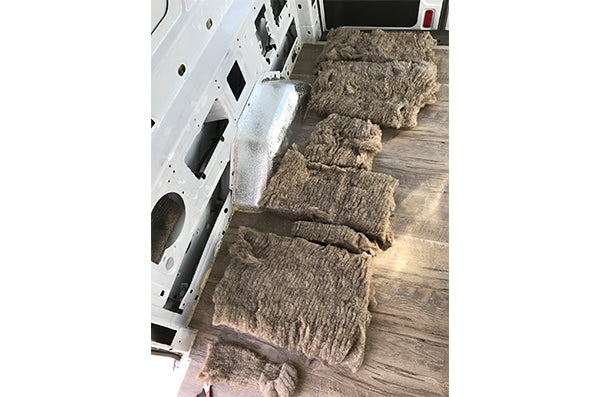
Using our Black Mountain wool insulation (post to come on choosing insulation), we insulated every inch of the van walls that would be below the bed. We used 3M high strength contact adhesive to secure the insulation to the walls. Key Tip: The 3M adhesive bonds to itself, so it must be sprayed on both the insulation and the van. Once this was complete, we covered the lower openings with Reflectix for an additional layer of insulation.


Install:
With our design mapped out, thanks to the folks at Sprinter Van Diaries, our first step was to come up with the measurements that worked for our needs. We wanted the bed to stop at the rear opening of the sliding door and be able to sit up in bed. Also, we needed at least a 16" wide x 20" deep opening on the floor of the drivers side for our electrical cabinet as well as a 5" wide x 13" deep opening on the front passenger side floor for a future Webasto furnace. Based on these requirements, we landed on the following measurements:
Driver side frame: 36" H x 20" W x 67.5" L
Passenger side frame: 36"H x 10.5"W x 67.5"L
We started by building the passenger side frame using our 2x3's and 3 1/2" decking screws. We built the inside facing frame first, then attached bottom squares, followed by the outside facing frame and then finally the interior cross support beams. Once the passenger side frame was complete, we stored it in the garage and began building the drivers side frame. With both frames completed, we applied two coats of stain to tone down the fresh construction look.


Our next step was to create a backing to the frame which would hide the insulation and give the cargo area a completed look. We chose to back the frame vs attaching the backing directly to the van to avoid having to drill into the van and reduce any potential noise from friction between the wood and the van. We used a 1/8 plywood for our backing material. We measured and cut a rectangular piece to fit the entire back of each frame. Once these pieces were cut, we measured the distance from each end where the wheel wells began and ended and used the plastic wheel well coverings to trace the shape we needed to cut. We laid a bead of wood glue on all contact points of the backing and the 2x3's and used small tack nails to secure the backing to the frame and let the glue dry.

Now that the backing was secured to the frame, we still had two more cuts to make, one to access the shore power outlet and the other for access to wires from the electrical cabinet. For a clean look and quick access to our shore power outlet, we would be using a 6" marine inspection hatch (see our earlier post on "shore power"). We simply traced the outline of the hatch and used our jigsaw to cut the circular hole. As for our electrical cabinet, we were not entirely sure of our future needs here, so decided to cut out a panel the length of the cabinet just to be safe.

With the the frames completed and backed, it was now time to secure them into place in the van. We used two 1" L brackets, drilled into the floor to hold each side snug against the van. Nowhere in this design is the bed attached to the van. The L brackets and pressure from the cross beams keep the bed structure firmly in place.

We used a total of 5 crossbeams in this design, 2 2x3's (one at each end) and 3 1x3's (trying to save a little bit of weight). To secure the crossbeams in place we used the krig pocket hole jig and screws. This tool is amazing and must have for the van build and all other wood working projects! Make sure the front crossbeam is flush with the front of the frame as this will make any future drawer or cabinet install much easier.

The next step in our bed build was to create the plywood platform spanning the top of the bed frame. We used two 4x8 sheets of 1/2" plywood, covered with 3 healthy coats of polyurethane. The gap between the plywood in the first picture is nothing strategic or intentional...just a slight miss measurement!

Along with cutting the plywood to fit both length and width, we needed to make a few more difficult cuts as well. The rear corners of the plywood were cut to sit flush against the angles of the rear corners of the van. These cuts allowed for the rear of the bed platform to extend flush with the rear doors when closed. In order to make these cuts accurately, we cut a piece of a cardboard box to use as a template and traced the cut lines onto the plywood.

Inspired by Sprinter Van Diaries, we decided to add a "secret" storage compartment under the mattress on the front side of the bed frame. The first step in this process was to cut out the section for our compartment in the plywood platform. We needed to get creative with our cut to be able to properly secure both the compartment door and the plywood platform to the 2x3 bed frame. Had we not cut these "bump outs," there would have been very limited support for this section of the plywood platform. Also notice that the plywood platform was cut to cover only 1/2 of the 2x3 frame in order to give the compartment lid a place to sit.

We then cut the lid of the "secret compartment" with the inverse of the "bump outs" and placed 3 basic hinges along the top for easy access into the compartment. The last step in the process was to add a 1/2" birch veneer plywood bottom using pocket screws.

With our bed frame and platform complete, we began the process of shopping for a mattress. We decided on an 8" Zinus memory foam mattress. Along with begin SUPER comfortable, this mattress is offered in a "short queen" size which fit our platform perfectly. We only needed to make slight cuts in the rear corners which was easy as the mattress cover can be zipped off to expose the foam. These cuts were made with just a basic pair of scissors. We have been extremely happy with this mattress so far!
5 comments
Amanda, Seek Dry Goods
Flora- We used 1″×3″ Pine boards for the frame. It was sturdy and easy to work with!
Flora- We used 1″×3″ Pine boards for the frame. It was sturdy and easy to work with!
Flora McMicking
What timber did you use for the frame – and what sizes? Looks great!
What timber did you use for the frame – and what sizes? Looks great!
Larry
Tanner,
Sorry for the confusion. The bed is oriented and we sleep front to back in the van vs side to side. The dimensions of the bed platform and mattress measure 72" long by 60" wide. The mattress is a queen short which is a common RV size and fits two people very comfortably. Also the bed frame stops just before the sliding door opening which maximized the “living space” in the front of the van. Let us know if you still have any questions and best of luck on the bed update!
Tanner James
Hey team! I also have a ford transit myself and am looking at the potential to change my bed from horizontal (wall to wall) to length wise. With the side wall my sleeping platform is only 65inches in length which is fairly cramped for two people. I am looking at switching it lengthwise and being able to comfortably fit a full or possibly even a queen. I initially thought this is what you had done but I am confused looking at your pictures because In some you are laying horizontal and some it looks lengthwise, can you clarify which way your bed is oriented and the dimensions? Also if it is In fact lengthwise, does the bed stick out past the door when it opens? Thanks in advance!
Hey team! I also have a ford transit myself and am looking at the potential to change my bed from horizontal (wall to wall) to length wise. With the side wall my sleeping platform is only 65inches in length which is fairly cramped for two people. I am looking at switching it lengthwise and being able to comfortably fit a full or possibly even a queen. I initially thought this is what you had done but I am confused looking at your pictures because In some you are laying horizontal and some it looks lengthwise, can you clarify which way your bed is oriented and the dimensions? Also if it is In fact lengthwise, does the bed stick out past the door when it opens? Thanks in advance!
Tom
I like this design. I have a 2017 Ford Transit 350 mid roof van. Thanks for the info.
I like this design. I have a 2017 Ford Transit 350 mid roof van. Thanks for the info.